Spring学习

SSM整合

在这里插入图片描述

学习了那么久,终于把SpringSpringMVCMybatis这些框架给看完了。很不错,学习到了很多的知识,以前不懂的东西也慢慢的明白了。今天学习一下如何整合这三个框架。SSM整合学习的是狂神的。下面有很多是和狂神的一样的,这一篇只是我自己的学习记录。

<一>SSM是什么意思

SSM(Spring+SpringMVC+MyBatis)框架集由Spring、MyBatis两个开源框架整合而成(SpringMVC是Spring中的部分内容)。常作为数据源较简单的web项目的框架。

Spring
  Spring就像是整个项目中装配bean的大工厂,在配置文件中可以指定使用特定的参数去调用实体类的构造方法来实例化对象。也可以称之为项目中的粘合剂。
  Spring的核心思想是IoC(控制反转),即不再需要程序员去显式地new一个对象,而是让Spring框架帮你来完成这一切。
SpringMVC
  SpringMVC在项目中拦截用户请求,它的核心Servlet即DispatcherServlet承担中介或是前台这样的职责,将用户请求通过HandlerMapping去匹配Controller,Controller就是具体对应请求所执行的操作。SpringMVC相当于SSH框架中struts。
mybatis
  mybatis是对jdbc的封装,它让数据库底层操作变的透明。mybatis的操作都是围绕一个sqlSessionFactory实例展开的。mybatis通过配置文件关联到各实体类的Mapper文件,Mapper文件中配置了每个类对数据库所需进行的sql语句映射。在每次与数据库交互时,通过sqlSessionFactory拿到一个sqlSession,再执行sql命令。

页面发送请求给控制器,控制器调用业务层处理逻辑,逻辑层向持久层发送请求,持久层与数据库交互,后将结果返回给业务层,业务层将处理逻辑发送给控制器,控制器再调用视图展现数据。

<二>环境要求

开发环境:

  • IDEA 2020.1.3

  • JDK 1.8

  • MySQL 8.0.21

  • Tomcat 9.0.14

  • Maven 3.6.3

    要求:

  • 需要熟练掌握MySQL数据库,Spring,JavaWeb及MyBatis知识,简单的前端知识;

<三>搭建基本环境

数据库环境:

创建一个存放书籍数据的数据库表

1
2
3
4
5
6
7
8
9
10
11
12
13
14
15
16
17
18
CREATE DATABASE `ssmbuild`;

USE `ssmbuild`;

DROP TABLE IF EXISTS `books`;

CREATE TABLE `books` (
`bookID` INT(10) NOT NULL AUTO_INCREMENT COMMENT '书id',
`bookName` VARCHAR(100) NOT NULL COMMENT '书名',
`bookCounts` INT(11) NOT NULL COMMENT '数量',
`detail` VARCHAR(200) NOT NULL COMMENT '描述',
KEY `bookID` (`bookID`)
) ENGINE=INNODB DEFAULT CHARSET=utf8

INSERT INTO `books`(`bookID`,`bookName`,`bookCounts`,`detail`)VALUES
(1,'Java',1,'从入门到放弃'),
(2,'MySQL',10,'从删库到跑路'),
(3,'Linux',5,'从进门到进牢');

基本环境搭建:

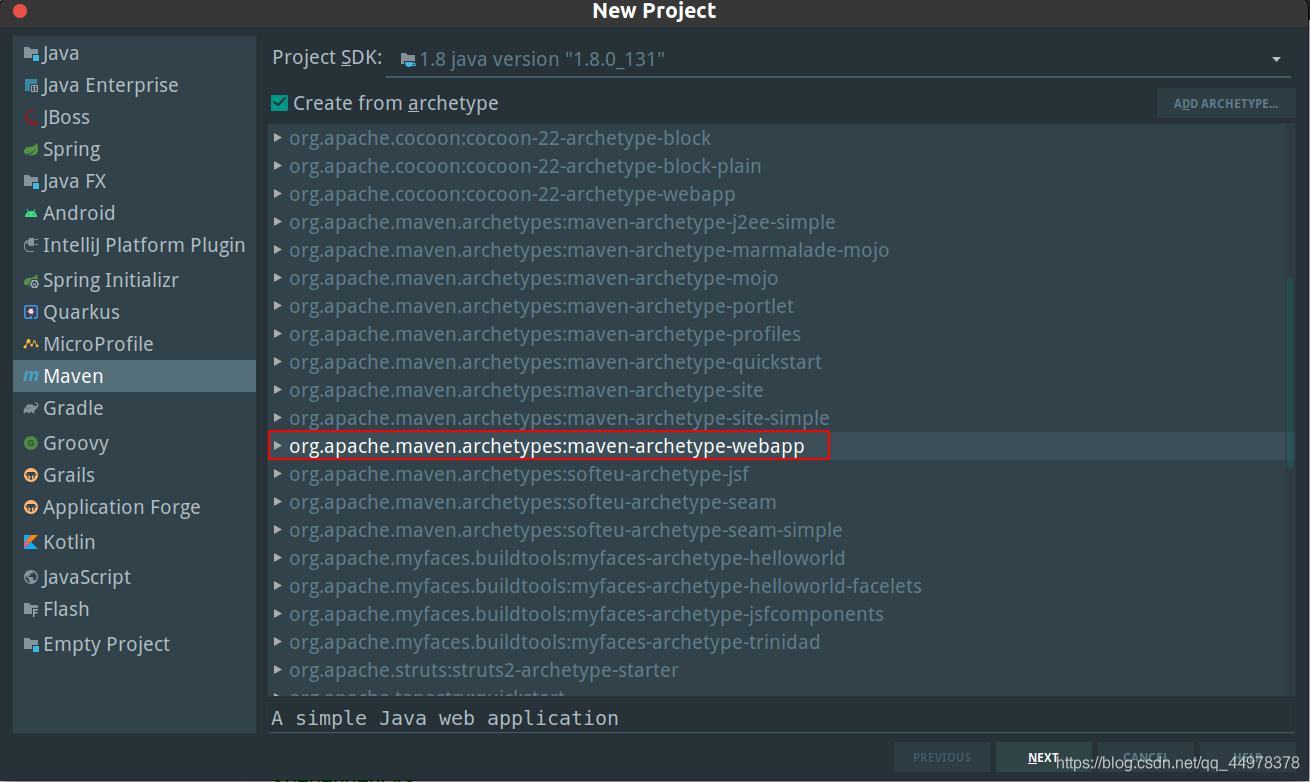
1.创建一个带有webapp骨架的Maven项目,名字随意

在这里插入图片描述

2.在pom.xml导入相关依赖:

1
2
3
4
5
6
7
8
9
10
11
12
13
14
15
16
17
18
19
20
21
22
23
24
25
26
27
28
29
30
31
32
33
34
35
36
37
38
39
40
41
42
43
44
45
46
47
48
49
50
51
52
53
54
55
56
57
58
59
60
61
62
63
64
65
66
67
68
<dependencies>
<!--Junit-->
<dependency>
<groupId>junit</groupId>
<artifactId>junit</artifactId>
<version>4.12</version>
</dependency>
<!--数据库驱动-->
<dependency>
<groupId>mysql</groupId>
<artifactId>mysql-connector-java</artifactId>
<version>8.0.21</version>
</dependency>
<!-- 数据库连接池 -->
<dependency>
<groupId>com.mchange</groupId>
<artifactId>c3p0</artifactId>
<version>0.9.5.2</version>
</dependency>

<!--Servlet - JSP -->
<dependency>
<groupId>javax.servlet</groupId>
<artifactId>servlet-api</artifactId>
<version>2.5</version>
</dependency>
<dependency>
<groupId>javax.servlet.jsp</groupId>
<artifactId>jsp-api</artifactId>
<version>2.2</version>
</dependency>
<dependency>
<groupId>javax.servlet</groupId>
<artifactId>jstl</artifactId>
<version>1.2</version>
</dependency>

<!--Mybatis-->
<dependency>
<groupId>org.mybatis</groupId>
<artifactId>mybatis</artifactId>
<version>3.5.2</version>
</dependency>
<dependency>
<groupId>org.mybatis</groupId>
<artifactId>mybatis-spring</artifactId>
<version>2.0.2</version>
</dependency>

<!--Spring-->
<dependency>
<groupId>org.springframework</groupId>
<artifactId>spring-webmvc</artifactId>
<version>5.1.9.RELEASE</version>
</dependency>
<dependency>
<groupId>org.springframework</groupId>
<artifactId>spring-jdbc</artifactId>
<version>5.1.9.RELEASE</version>
</dependency>

<!--Lombok-->
<dependency>
<groupId>org.projectlombok</groupId>
<artifactId>lombok</artifactId>
<version>1.18.12</version>
</dependency>
</dependencies>

3.Maven资源过滤设置

1
2
3
4
5
6
7
8
9
10
11
12
13
14
15
16
17
18
19
20
<build>
<resources>
<resource>
<directory>src/main/java</directory>
<includes>
<include>**/*.properties</include>
<include>**/*.xml</include>
</includes>
<filtering>false</filtering>
</resource>
<resource>
<directory>src/main/resources</directory>
<includes>
<include>**/*.properties</include>
<include>**/*.xml</include>
</includes>
<filtering>false</filtering>
</resource>
</resources>
</build>

4.创建基本包结构:

在src/main/java下建立包结构:

  • com.liu.dao:Dao层实现
  • com.liu.pojo:实体类:使用lombok
  • com.liu.service:业务层的实现
  • com.liu.controller:web层的实现

5.创建Spring以及mybatis的核心配置文件

  • Spring的核心配置文件appliactionContext.xml文件
1
2
3
4
5
6
7
<?xml version="1.0" encoding="UTF-8"?>
<beans xmlns="http://www.springframework.org/schema/beans"
xmlns:xsi="http://www.w3.org/2001/XMLSchema-instance"
xsi:schemaLocation="http://www.springframework.org/schema/beans
http://www.springframework.org/schema/beans/spring-beans.xsd">

</beans>
  • mybatis核心配置文件mybatis-config.xml
1
2
3
4
5
6
7
<?xml version="1.0" encoding="UTF-8" ?>
<!DOCTYPE configuration
PUBLIC "-//mybatis.org//DTD Config 3.0//EN"
"http://mybatis.org/dtd/mybatis-3-config.dtd">
<configuration>

</configuration>

6.首先实现Dao层

<1>首先根据数据库创建一个实体类

在这里交给大家一个小技巧,IDEA是可以连接数据库的。我们可以用IDEA来连接Mysql,连接之后我们就可以不用在IDEA和mysql可视化工具之间来回切换,不必再缩小IDEA。(方法在IDEA的使用文章里写的有)
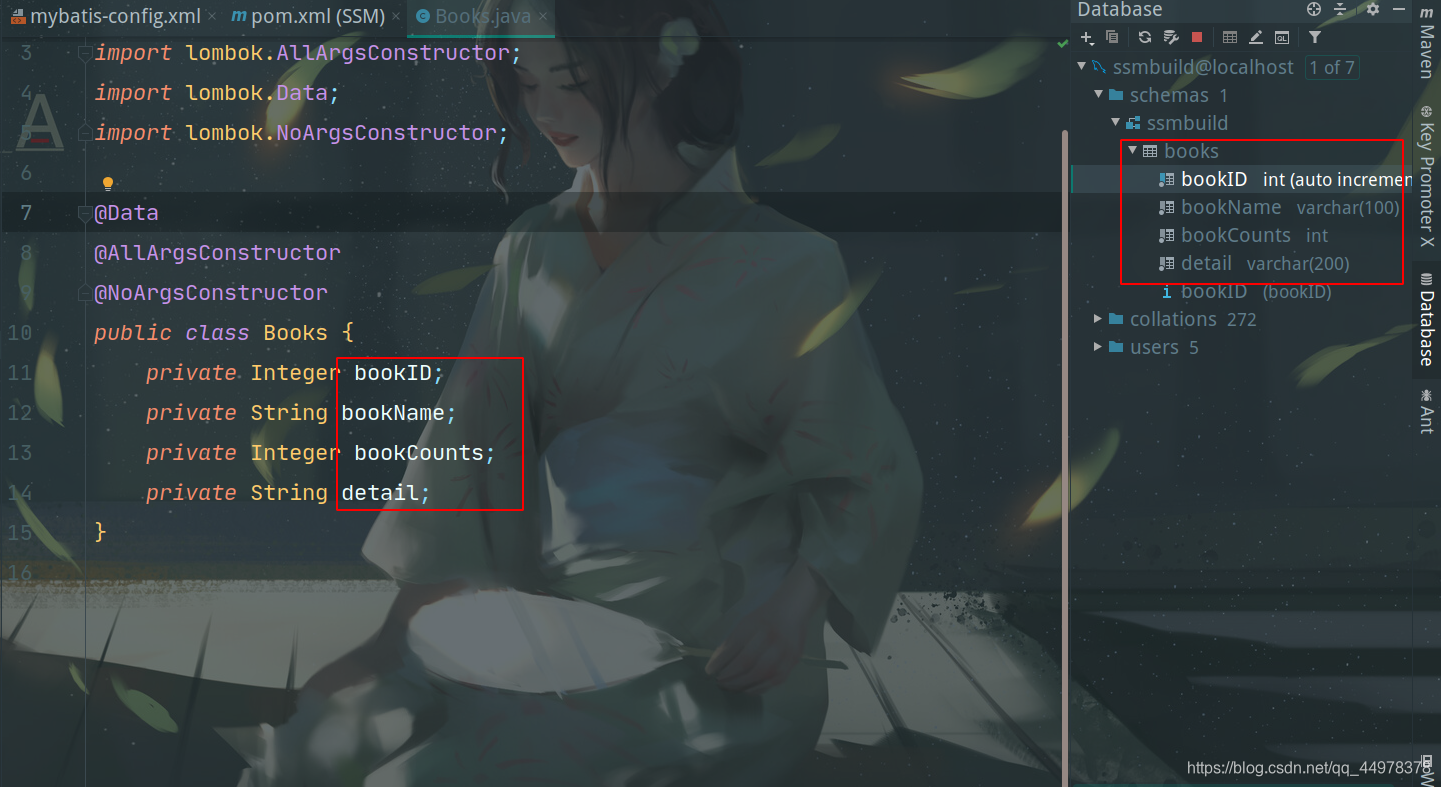
在这里插入图片描述

使用Lombok创建Books实体:

1
2
3
4
5
6
7
8
9
10
11
12
13
14
15
package com.liu.pojo;

import lombok.AllArgsConstructor;
import lombok.Data;
import lombok.NoArgsConstructor;

@Data
@AllArgsConstructor
@NoArgsConstructor
public class Books {
private Integer bookID;
private String bookName;
private Integer bookCounts;
private String detail;
}
<2>编写Dao层的BookDao接口
1
2
3
4
5
6
7
8
9
10
11
12
13
14
15
16
17
18
19
20
21
package com.liu.dao;
import com.liu.pojo.Books;
import org.apache.ibatis.annotations.Param;
import java.util.List;

public interface BookDao {
//增加一个Book
void addBook(Books book);

//根据id删除一个Book
int deleteBookById(@Param("bookID") int id);

//更新Book
int updateBook(Books books);

//根据id查询,返回一个Book
Books queryBookById(@Param("bookID")int id);

//查询全部Book,返回list集合
List<Books> queryAllBook();
}
<3>创建BookMapper.xml文件
1
2
3
4
5
6
7
8
9
10
11
12
13
14
15
16
17
18
19
20
21
22
23
24
25
26
27
28
29
30
31
32
33
34
<?xml version="1.0" encoding="UTF-8" ?>
<!DOCTYPE mapper
PUBLIC "-//mybatis.org//DTD Mapper 3.0//EN"
"http://mybatis.org/dtd/mybatis-3-mapper.dtd">
<mapper namespace="com.liu.dao.BookDao">
<!--增加一个Book-->
<insert id="addBook" parameterType="Books">
insert into ssmbuild.books(bookName,bookCounts,detail)
values (#{bookName}, #{bookCounts}, #{detail})
</insert>

<!--根据id删除一个Book-->
<delete id="deleteBookById" parameterType="int">
delete from ssmbuild.books where bookID=#{bookID}
</delete>

<!--更新Book-->
<update id="updateBook" parameterType="Books">
update ssmbuild.books
set bookName = #{bookName},bookCounts = #{bookCounts},detail = #{detail}
where bookID = #{bookID}
</update>

<!--根据id查询,返回一个Book-->
<select id="queryBookById" resultType="Books">
select * from ssmbuild.books
where bookID = #{bookID}
</select>

<!--查询全部Book-->
<select id="queryAllBook" resultType="Books">
SELECT * from ssmbuild.books
</select>
</mapper>
<4>在mybatis核心配置文件中配置映射文件

在核心配置文件中配置日志信息,这里不需要配置数据源信息,数据源信息交给Spring去创建。为实体类起一个别名,以及加载映射文件。

1
2
3
4
5
6
7
8
9
10
11
12
13
14
15
16
17
18
19
<?xml version="1.0" encoding="UTF-8" ?>
<!DOCTYPE configuration
PUBLIC "-//mybatis.org//DTD Config 3.0//EN"
"http://mybatis.org/dtd/mybatis-3-config.dtd">
<configuration>
<!--日志信息-->
<settings>
<setting name="logImpl" value="STDOUT_LOGGING"/>
</settings>
<!--不需要配置数据源信息,因为会交给Spring-->
<!--配置别名-->
<typeAliases>
<package name="com.liu.pojo"/>
</typeAliases>
<!--配置映射文件-->
<mappers>
<mapper resource="BookMapper.xml"/>
</mappers>
</configuration>

7.实现service层

<1>创建BookService接口来调用dao层代码
1
2
3
4
5
6
7
8
9
10
11
12
13
14
15
16
17
18
19
20
21
22
23
package com.liu.service;

import com.liu.pojo.Books;
import org.apache.ibatis.annotations.Param;

import java.util.List;

public interface BookService {
//增加一个Book
void addBook(Books book);

//根据id删除一个Book
int deleteBookById(int id);

//更新Book
int updateBook(Books books);

//根据id查询,返回一个Book
Books queryBookById(int id);

//查询全部Book,返回list集合
List<Books> queryAllBook();
}
<2>创建BookServiceImpl来实现这些方法

实现这些方法无非就是让service层去调用dao层方法

1
2
3
4
5
6
7
8
9
10
11
12
13
14
15
16
17
18
19
20
21
22
23
24
25
26
27
28
29
30
31
32
33
34
35
36
37
38
39
40
41
42
43
package com.liu.service.Impl;

import com.liu.dao.BookDao;
import com.liu.pojo.Books;
import com.liu.service.BookService;
import org.springframework.beans.factory.annotation.Autowired;
import org.springframework.stereotype.Service;

import java.util.List;
@Service
public class BookServiceImpl implements BookService {
//service调dao层
@Autowired
private BookDao bookDao;
public void setBookDao(BookDao bookDao) {
this.bookDao = bookDao;
}

@Override
public void addBook(Books book) {
bookDao.addBook(book);
}

@Override
public int deleteBookById(int id) {
return bookDao.deleteBookById(id);
}

@Override
public int updateBook(Books books) {
return bookDao.updateBook(books);
}

@Override
public Books queryBookById(int id) {
return bookDao.queryBookById(id);
}

@Override
public List<Books> queryAllBook() {
return bookDao.queryAllBook();
}
}

8.接下来我们用Spring来整合

<1>编写spring-dao.xml配置文件

这里说明一下:为什么我不在spring的核心配置文件中直接配置,而是要重新建一个spring-dao.xml来配置呢?

这不是显示了解藕合思想吗?

我们把dao层的配置、service层的配置、controller层的配置都给分开。

一:显示配置不会太乱

二:当出现错误的时候容易排除

好,接下来我们看看我们在这个spring-dao.xml需要配置什么呢?

  • 加载properties文件信息

  • 配置数据源信息

  • 配置SqlSessionFactory对象

首先创建一个jdbc.properties文件

1
2
3
4
jdbc.driver=com.mysql.cj.jdbc.Driver
jdbc.url=jdbc:mysql:///ssmbuild?useSSL=false&useUnicode=true&characterEconding=UTF-8&allowPublicKeyRetrieval=true
jdbc.user=root
jdbc.password=131411

创建一个spring-dao.xml文件

1
2
3
4
5
6
7
8
9
10
11
12
13
14
15
16
17
18
19
20
21
22
23
24
25
26
27
28
29
30
31
32
33
34
35
36
37
38
39
40
41
<?xml version="1.0" encoding="UTF-8"?>
<beans xmlns="http://www.springframework.org/schema/beans"
xmlns:xsi="http://www.w3.org/2001/XMLSchema-instance"
xmlns:context="http://www.springframework.org/schema/context"
xsi:schemaLocation="http://www.springframework.org/schema/beans http://www.springframework.org/schema/beans/spring-beans.xsd http://www.springframework.org/schema/context https://www.springframework.org/schema/context/spring-context.xsd">

<!--关联数据库配置文件-->
<context:property-placeholder location="classpath:jdbc.properties"/>
<!--获得连接池对象-->
<bean id="dataSource" class="com.mchange.v2.c3p0.ComboPooledDataSource">
<property name="driverClass" value="${jdbc.driver}"/>
<property name="jdbcUrl" value="${jdbc.url}"/>
<property name="user" value="${jdbc.user}"/>
<property name="password" value="${jdbc.password}"/>

<!-- c3p0连接池的私有属性 -->
<property name="maxPoolSize" value="30"/>
<property name="minPoolSize" value="10"/>
<!-- 关闭连接后不自动commit -->
<property name="autoCommitOnClose" value="false"/>
<!-- 获取连接超时时间 -->
<property name="checkoutTimeout" value="10000"/>
<!-- 当获取连接失败重试次数 -->
<property name="acquireRetryAttempts" value="2"/>
</bean>
<!--sqlSessionFactory-->
<bean id="sqlSessionFactory" class="org.mybatis.spring.SqlSessionFactoryBean">
<property name="dataSource" ref="dataSource"/>
<!--绑定mybatis的配置文件-->
<property name="configLocation" value="classpath:mybatis-config.xml"/>
</bean>

<!-- 4.配置扫描Dao接口包,动态实现Dao接口注入到spring容器中 -->
<!--解释 :https://www.cnblogs.com/jpfss/p/7799806.html-->
<bean class="org.mybatis.spring.mapper.MapperScannerConfigurer">
<!-- 注入sqlSessionFactory -->
<property name="sqlSessionFactoryBeanName" value="sqlSessionFactory"/>
<!-- 给出需要扫描Dao接口包 -->
<property name="basePackage" value="com.liu.dao"/>
</bean>
</beans>
<2>编写spring-service.xml配置文件
1
2
3
4
5
6
7
8
9
10
11
12
13
14
15
16
17
18
19
20
<?xml version="1.0" encoding="UTF-8"?>
<beans xmlns="http://www.springframework.org/schema/beans"
xmlns:xsi="http://www.w3.org/2001/XMLSchema-instance"
xmlns:context="http://www.springframework.org/schema/context"
xsi:schemaLocation="http://www.springframework.org/schema/beans
http://www.springframework.org/schema/beans/spring-beans.xsd
http://www.springframework.org/schema/context
http://www.springframework.org/schema/context/spring-context.xsd">
<!-- 扫描service相关的bean -->
<context:component-scan base-package="com.liu.service"/>
<!--将我们所有的业务类,注入到spring-->
<bean id="BookServiceImpl" class="com.liu.service.Impl.BookServiceImpl">
<property name="bookDao" ref="bookDao"/>
</bean>
<!--声明式事务-->
<bean id="transactionManager" class="org.springframework.jdbc.datasource.DataSourceTransactionManager">
<!--注入数据源-->
<property name="dataSource" ref="dataSource"/>
</bean>
</beans>
<3>SpringMVC

首先在web.xml配置

1
2
3
4
5
6
7
8
9
10
11
12
13
14
15
16
17
18
19
20
21
22
23
24
25
26
27
28
29
30
31
32
33
34
35
36
37
38
39
40
41
42
43
44
<?xml version="1.0" encoding="UTF-8"?>
<web-app xmlns="http://xmlns.jcp.org/xml/ns/javaee"
xmlns:xsi="http://www.w3.org/2001/XMLSchema-instance"
xsi:schemaLocation="http://xmlns.jcp.org/xml/ns/javaee http://xmlns.jcp.org/xml/ns/javaee/web-app_4_0.xsd"
version="4.0">

<!--DispatcherServlet-->
<servlet>
<servlet-name>DispatcherServlet</servlet-name>
<servlet-class>org.springframework.web.servlet.DispatcherServlet</servlet-class>
<init-param>
<param-name>contextConfigLocation</param-name>
<!--一定要注意:我们这里加载的是总的配置文件,之前被这里坑了!-->
<param-value>classpath:applicationContext.xml</param-value>
</init-param>
<load-on-startup>1</load-on-startup>
</servlet>
<servlet-mapping>
<servlet-name>DispatcherServlet</servlet-name>
<url-pattern>/</url-pattern>
</servlet-mapping>

<!--encodingFilter-->
<filter>
<filter-name>encodingFilter</filter-name>
<filter-class>
org.springframework.web.filter.CharacterEncodingFilter
</filter-class>
<init-param>
<param-name>encoding</param-name>
<param-value>utf-8</param-value>
</init-param>
</filter>
<filter-mapping>
<filter-name>encodingFilter</filter-name>
<url-pattern>/*</url-pattern>
</filter-mapping>

<!--Session过期时间-->
<session-config>
<session-timeout>15</session-timeout>
</session-config>

</web-app>

创建一个spring-mvc.xml配置文件

1
2
3
4
5
6
7
8
9
10
11
12
13
14
15
16
17
18
19
20
21
22
23
24
25
26
27
28
29
<?xml version="1.0" encoding="UTF-8"?>
<beans xmlns="http://www.springframework.org/schema/beans"
xmlns:xsi="http://www.w3.org/2001/XMLSchema-instance"
xmlns:context="http://www.springframework.org/schema/context"
xmlns:mvc="http://www.springframework.org/schema/mvc"
xsi:schemaLocation="http://www.springframework.org/schema/beans
http://www.springframework.org/schema/beans/spring-beans.xsd
http://www.springframework.org/schema/context
http://www.springframework.org/schema/context/spring-context.xsd
http://www.springframework.org/schema/mvc
https://www.springframework.org/schema/mvc/spring-mvc.xsd">

<!-- 配置SpringMVC -->
<!-- 1.开启SpringMVC注解驱动 -->
<mvc:annotation-driven />
<!-- 2.静态资源默认servlet配置-->
<mvc:default-servlet-handler/>

<!-- 3.配置jsp 显示ViewResolver视图解析器 -->
<bean class="org.springframework.web.servlet.view.InternalResourceViewResolver">
<property name="viewClass" value="org.springframework.web.servlet.view.JstlView" />
<property name="prefix" value="/WEB-INF/jsp/" />
<property name="suffix" value=".jsp" />
</bean>

<!-- 4.扫描web相关的bean -->
<context:component-scan base-package="com.liu.controller" />

</beans>

9.Spring配置整合文件,applicationContext.xml

1
2
3
4
5
6
7
8
9
<?xml version="1.0" encoding="UTF-8"?>
<beans xmlns="http://www.springframework.org/schema/beans"
xmlns:xsi="http://www.w3.org/2001/XMLSchema-instance"
xmlns:context="http://www.springframework.org/schema/context"
xsi:schemaLocation="http://www.springframework.org/schema/beans http://www.springframework.org/schema/beans/spring-beans.xsd http://www.springframework.org/schema/context https://www.springframework.org/schema/context/spring-context.xsd">
<import resource="classpath:spring-dao.xml"/>
<import resource="classpath:spring-service.xml"/>
<import resource="classpath:spring-mvc.xml"/>
</beans>

<四>编写业务实现

<1>实现查询所有书籍

1.在Controller层编写代码

1
2
3
4
5
6
7
8
9
10
11
12
13
14
@Controller
@RequestMapping("/book")
public class BookController {
@Qualifier("bookServiceImpl")
@Autowired
private BookService bookService;
//查询全部的书籍,并且返回一个书籍展示页面
@RequestMapping("/allBook")
public String list(Model model){
List<Books> books = bookService.queryAllBook();
model.addAttribute("list",books);
return "allBook";
}
}

2.编写allBook页面

1
2
3
4
5
6
7
8
9
10
11
12
13
14
15
16
17
18
19
20
21
22
23
24
25
26
27
28
29
30
31
32
33
34
35
36
37
38
39
40
41
42
43
44
45
46
<%@ taglib prefix="c" uri="http://java.sun.com/jsp/jstl/core" %>
<%@ page contentType="text/html;charset=UTF-8" language="java" %>
<html>
<head>
<title>书籍列表</title>
<meta name="viewport" content="width=device-width, initial-scale=1.0">
<!-- 引入 Bootstrap -->
<link href="https://cdn.bootcss.com/bootstrap/3.3.7/css/bootstrap.min.css" rel="stylesheet">
</head>
<body>
<div class="container">
<div class="row clearfix">
<div class="col-md-12 column">
<div class="page-header">
<h1>
<small>书籍列表 —— 显示所有书籍</small>
</h1>
</div>
</div>
</div>
<div class="row clearfix">
<div class="col-md-12 column">
<table class="table table-hover table-striped">
<thead>
<tr>
<th>书籍编号</th>
<th>书籍名字</th>
<th>书籍数量</th>
<th>书籍详情</th>
<th>操作</th>
</tr>
</thead>
<tbody>
<c:forEach var="book" items="${requestScope.get('list')}">
<tr>
<td>${book.getBookID()}</td>
<td>${book.getBookName()}</td>
<td>${book.getBookCounts()}</td>
<td>${book.getDetail()}</td>
</tr>
</c:forEach>
</tbody>
</table>
</div>
</div>
</div>

3.index.jsp页面太丑了,换个

1
2
3
4
5
6
7
8
9
10
11
12
13
14
15
16
17
18
19
20
21
22
23
24
25
26
27
28
29
<%@ page language="java" contentType="text/html; charset=UTF-8" pageEncoding="UTF-8" %>
<!DOCTYPE HTML>
<html>
<head>
<title>首页</title>
<style type="text/css">
a {
text-decoration: none;
color: black;
font-size: 18px;
}
h3 {
width: 180px;
height: 38px;
margin: 100px auto;
text-align: center;
line-height: 38px;
background: deepskyblue;
border-radius: 4px;
}
</style>
</head>
<body>

<h3>
<a href="${pageContext.request.contextPath}/book/allBook">点击进入列表页</a>
</h3>
</body>
</html>

4.配置一下tomcat,试一下能不能跑起来。

<2>实现添加功能

1.首先在controller层

1
2
3
4
5
6
7
8
9
10
11
//跳转到增加页面
@RequestMapping("/toAddBook")
public String toAddPaper(){
return "addBook";
}
//添加书籍的请求
@RequestMapping("/addBook")
public String addBook(Books books){
bookService.addBook(books);
return "redirect:/book/allBook";
}

2.编写addBook.jsp页面

1
2
3
4
5
6
7
8
9
10
11
12
13
14
15
16
17
18
19
20
21
22
23
24
25
26
27
28
29
30
<%@ taglib prefix="c" uri="http://java.sun.com/jsp/jstl/core" %>
<%@ page contentType="text/html;charset=UTF-8" language="java" %>

<html>
<head>
<title>新增书籍</title>
<meta name="viewport" content="width=device-width, initial-scale=1.0">
<!-- 引入 Bootstrap -->
<link href="https://cdn.bootcss.com/bootstrap/3.3.7/css/bootstrap.min.css" rel="stylesheet">
</head>
<body>
<div class="container">

<div class="row clearfix">
<div class="col-md-12 column">
<div class="page-header">
<h1>
<small>新增书籍</small>
</h1>
</div>
</div>
</div>
<form action="${pageContext.request.contextPath}/book/addBook" method="post">
书籍名称:<input type="text" name="bookName" required><br><br><br>
书籍数量:<input type="text" name="bookCounts" required><br><br><br>
书籍详情:<input type="text" name="detail" required><br><br><br>
<input type="submit" value="添加">
</form>

</div>

3.更改allBook.jsp

1
2
3
4
5
6
7
8
9
10
11
12
13
14
15
16
17
18
19
20
21
22
23
24
25
26
27
28
29
30
31
32
33
34
35
36
37
38
39
40
41
42
43
44
45
46
47
48
49
50
51
52
53
54
55
56
<%@ taglib prefix="c" uri="http://java.sun.com/jsp/jstl/core" %>
<%@ page contentType="text/html;charset=UTF-8" language="java" %>
<html>
<head>
<title>书籍列表</title>
<meta name="viewport" content="width=device-width, initial-scale=1.0">
<!-- 引入 Bootstrap -->
<link href="https://cdn.bootcss.com/bootstrap/3.3.7/css/bootstrap.min.css" rel="stylesheet">
</head>
<body>

<div class="container">

<div class="row clearfix">
<div class="col-md-12 column">
<div class="page-header">
<h1>
<small>书籍列表 —— 显示所有书籍</small>
</h1>
</div>
</div>
</div>

<div class="row">
<div class="col-md-4 column">
<a class="btn btn-primary" href="${pageContext.request.contextPath}/book/toAddBook">新增</a>
</div>
</div>

<div class="row clearfix">
<div class="col-md-12 column">
<table class="table table-hover table-striped">
<thead>
<tr>
<th>书籍编号</th>
<th>书籍名字</th>
<th>书籍数量</th>
<th>书籍详情</th>
<th>操作</th>
</tr>
</thead>

<tbody>
<c:forEach var="book" items="${requestScope.get('list')}">
<tr>
<td>${book.getBookID()}</td>
<td>${book.getBookName()}</td>
<td>${book.getBookCounts()}</td>
<td>${book.getDetail()}</td>
</tr>
</c:forEach>
</tbody>
</table>
</div>
</div>
</div>

4.重新发布tomcat测试

<3>实现更改功能

1.在controller层

1
2
3
4
5
6
7
8
9
10
11
12
13
14
15
16
//跳转到修改页面
@RequestMapping("/toUpdateBook")
public String toUpdateBook(Model model, int id) {
Books books = bookService.queryBookById(id);
System.out.println(books);
model.addAttribute("book",books );
return "updateBook";
}
@RequestMapping("/updateBook")
public String updateBook(Model model, Books book) {
System.out.println(book);
bookService.updateBook(book);
Books books = bookService.queryBookById(book.getBookID());
model.addAttribute("books", books);
return "redirect:/book/allBook";
}

2.创建一个updateBook.jsp

1
2
3
4
5
6
7
8
9
10
11
12
13
14
15
16
17
18
19
20
21
22
23
24
25
26
27
28
29
30
<%@ taglib prefix="c" uri="http://java.sun.com/jsp/jstl/core" %>
<%@ page contentType="text/html;charset=UTF-8" language="java" %>
<html>
<head>
<title>修改信息</title>
<meta name="viewport" content="width=device-width, initial-scale=1.0">
<!-- 引入 Bootstrap -->
<link href="https://cdn.bootcss.com/bootstrap/3.3.7/css/bootstrap.min.css" rel="stylesheet">
</head>
<body>
<div class="container">

<div class="row clearfix">
<div class="col-md-12 column">
<div class="page-header">
<h1>
<small>修改信息</small>
</h1>
</div>
</div>
</div>

<form action="${pageContext.request.contextPath}/book/updateBook" method="post">
<input type="hidden" name="bookID" value="${book.bookID}"/>
书籍名称:<input type="text" name="bookName" value="${book.bookName}"/>
书籍数量:<input type="text" name="bookCounts" value="${book.bookCounts}"/>
书籍详情:<input type="text" name="detail" value="${book.detail}"/>
<input type="submit" value="提交"/>
</form>
</div>

3.更改allBook.jsp

1
2
3
4
5
6
7
8
9
10
11
12
13
14
15
16
17
18
19
20
21
22
23
24
25
26
27
28
29
30
31
32
33
34
35
36
37
38
39
40
41
42
43
44
45
46
47
48
49
50
51
52
53
54
55
56
57
58
59
<%@ taglib prefix="c" uri="http://java.sun.com/jsp/jstl/core" %>
<%@ page contentType="text/html;charset=UTF-8" language="java" %>
<html>
<head>
<title>书籍列表</title>
<meta name="viewport" content="width=device-width, initial-scale=1.0">
<!-- 引入 Bootstrap -->
<link href="https://cdn.bootcss.com/bootstrap/3.3.7/css/bootstrap.min.css" rel="stylesheet">
</head>
<body>

<div class="container">

<div class="row clearfix">
<div class="col-md-12 column">
<div class="page-header">
<h1>
<small>书籍列表 —— 显示所有书籍</small>
</h1>
</div>
</div>
</div>

<div class="row">
<div class="col-md-4 column">
<a class="btn btn-primary" href="${pageContext.request.contextPath}/book/toAddBook">新增</a>
</div>
</div>

<div class="row clearfix">
<div class="col-md-12 column">
<table class="table table-hover table-striped">
<thead>
<tr>
<th>书籍编号</th>
<th>书籍名字</th>
<th>书籍数量</th>
<th>书籍详情</th>
<th>操作</th>
</tr>
</thead>

<tbody>
<c:forEach var="book" items="${requestScope.get('list')}">
<tr>
<td>${book.getBookID()}</td>
<td>${book.getBookName()}</td>
<td>${book.getBookCounts()}</td>
<td>${book.getDetail()}</td>
<td>
<a href="${pageContext.request.contextPath}/book/toUpdateBook?id=${book.getBookID()}">更改</a>
</td>
</tr>
</c:forEach>
</tbody>
</table>
</div>
</div>
</div>

4.重新发布tomcat,测试运行

<4>实现删除功能

1.在controller层

1
2
3
4
5
@RequestMapping("/del/{bookId}")
public String deleteBook(@PathVariable("bookId") int id) {
bookService.deleteBookById(id);
return "redirect:/book/allBook";
}

2.更改一下allBook.jsp

1
2
3
4
5
6
7
8
9
10
11
12
13
14
15
16
17
18
19
20
21
22
23
24
25
26
27
28
29
30
<%@ taglib prefix="c" uri="http://java.sun.com/jsp/jstl/core" %>
<%@ page contentType="text/html;charset=UTF-8" language="java" %>

<html>
<head>
<title>新增书籍</title>
<meta name="viewport" content="width=device-width, initial-scale=1.0">
<!-- 引入 Bootstrap -->
<link href="https://cdn.bootcss.com/bootstrap/3.3.7/css/bootstrap.min.css" rel="stylesheet">
</head>
<body>
<div class="container">

<div class="row clearfix">
<div class="col-md-12 column">
<div class="page-header">
<h1>
<small>新增书籍</small>
</h1>
</div>
</div>
</div>
<form action="${pageContext.request.contextPath}/book/addBook" method="post">
书籍名称:<input type="text" name="bookName" required><br><br><br>
书籍数量:<input type="text" name="bookCounts" required><br><br><br>
书籍详情:<input type="text" name="detail" required><br><br><br>
<input type="submit" value="添加">
</form>

</div>

<五>总结

Spring+SpringMVC+mybatis这三个框架的学习还没结束。有些东西已经开始忘记了,要尝尝的复习,多看看书,理解理解源码。只有理解了源码,不管以后,它如何去变,底层的原理是一成不变的。

今天总结的可以当做一个模板,当需要快速开发一个SSM框架的时候,这个东西能当做模板来使用。

百度网盘:

链接: https://pan.baidu.com/s/17f7KJt-onsZu634nNaHcCA

密码: jp09

二维码:

在这里插入图片描述

点击查看
-------------------本文结束 感谢您的阅读-------------------