Spring学习

Spring的AOP

QQ图片20201006195406

一:什么是AOP?

百度介绍:

在软件业,AOP为Aspect Oriented Programming的缩写,意为:面向切面编程,通过预编译方式和运行期间动态代理实现程序功能的统一维护的一种技术。AOP是OOP的延续,是软件开发中的一个热点,也是Spring框架中的一个重要内容,是函数式编程的一种衍生范型。利用AOP可以对业务逻辑的各个部分进行隔离,从而使得业务逻辑各部分之间的耦合度降低,提高程序的可重用性,同时提高了开发的效率。

面向过程编程离我们已经有些遥远,面向对象编程正主宰着软件世界。当每个新的软件设计师都被要求掌握如何将需求功能转化成一个个类,并且定义它们的数据成员、行为,以及它们之间复杂的关系的时候,面向切面编程(Aspect-Oriented Programming,AOP)为我们带来了新的想法、新的思想、新的模式。

如果说面向对象编程是关注将需求功能划分为不同的并且相对独立,封装良好的类,并让它们有着属于自己的行为,依靠继承和多态等来定义彼此的关系的话;那么面向切面编程则是希望能够将通用需求功能从不相关的类当中分离出来,能够使得很多类共享一个行为,一旦发生变化,不必修改很多类,而只需要修改这个行为即可。

面向对象编程(OOP)实现:

image-20201005172920508

但可以发现二者有共同的行为:吃饭

面向切面编程(AOP):是通过预编译方式和运行期动态代理实现,在不修改源码的情况下给程序动态统一添加功能的一门技术。

AOP 是 OOP 的延续,是软件开发中的一个热点,也是Spring框架中的一个重要内容,是函数式编程的一种衍生范型。利用AOP可以对业务逻辑的各个部分进行隔离,从而使得业务逻辑各部分之间的耦合度降低,提高程序的可重用性,同时提高了开发的效率。

二: AOP 的作用及其优势

  • 作用:在程序运行期间,在不修改源码的情况下对方法进行功能增强
  • 优势:减少重复代码,提高开发效率,并且便于维护

三:AOP的底层实现

实际上,AOP 的底层是通过 Spring 提供的的动态代理技术实现的。在运行期间,Spring通过动态代理技术动态的生成代理对象,代理对象方法执行时进行增强功能的介入,在去调用目标对象的方法,从而完成功能的增强。

四:AOP 的动态代理技术

常用的动态代理技术

  • JDK 代理 : 基于接口的动态代理技术
  • cglib 代理:基于父类的动态代理技术

image-20201005200756299

**五:AOP **相关概念

  • Target(目标对象):代理的目标对象
  • Proxy (代理):一个类被 AOP 织入增强后,就产生一个结果代理类
  • Joinpoint(连接点):所谓连接点是指那些被拦截到的点。在spring中,这些点指的是方法,因为spring只支持方法类型的连接点
  • Pointcut(切入点):所谓切入点是指我们要对哪些 Joinpoint 进行拦截的定义
  • Advice(通知/ 增强):所谓通知是指拦截到 Joinpoint 之后所要做的事情就是通知
  • Aspect(切面):是切入点和通知(引介)的结合
  • Weaving(织入):是指把增强应用到目标对象来创建新的代理对象的过程。spring采用动态代理织入,而AspectJ采用编译期织入和类装载期织入

六:基于 XML AOP 开发

首先说明一下,为什么要学习XML配置的AOP开发。有的人肯定看到这会说,AOP?直接注解不就配置了吗?还搞个XML配置文件。我学习AOP是为了了解这门技术并使用这门技术,首先可以通过xml配置的方法了解AOP是怎样实现的,然后再通过注解进行优化使用。当你进行面试的时候,面试官肯定不会问你Spring框架是如何使用的,而最多的是问你Spring开发的原理是什么。搞懂原理,比熟练技术要好的多。原理是不会变的,只是实现的方法会日益更新,逐步趋向快捷方便。

①导入 AOP 相关坐标

1
2
3
4
5
6
7
8
9
10
11
12
13
14
15
16
17
18
19
20
21
22
23
24
25
26
27
28
29
30
<dependencies>
<dependency>
<groupId>org.springframework</groupId>
<artifactId>spring-aop</artifactId>
<version>5.2.7.RELEASE</version>
</dependency>
<dependency>
<groupId>org.aspectj</groupId>
<artifactId>aspectjweaver</artifactId>
<version>1.8.4</version>
</dependency>
<!--重点是上面两个,当然其他的Spring依赖也需要导入-->
<dependency>
<groupId>org.springframework</groupId>
<artifactId>spring-context</artifactId>
<version>5.2.7.RELEASE</version>
</dependency>
<dependency>
<groupId>junit</groupId>
<artifactId>junit</artifactId>
<version>4.13</version>
<scope>test</scope>
</dependency>
<!-- https://mvnrepository.com/artifact/org.springframework/spring-test -->
<dependency>
<groupId>org.springframework</groupId>
<artifactId>spring-test</artifactId>
<version>5.2.7.RELEASE</version>
</dependency>
</dependencies>

②创建目标接口和目标类(内部有切点)

目标接口:TargetInterface

1
2
3
4
5
package com.liu.aop;

public interface TargetInterface {
public void save();
}

目标类:Target

1
2
3
4
5
6
7
8
package com.liu.aop;

public class Target implements TargetInterface{

public void save() {
System.out.println("save running.....");
}
}

③创建切面类(内部有增强方法)

切面类:MyAspect

1
2
3
4
5
6
7
8
9
10
11
12
13
14
15
16
17
18
19
20
21
22
23
24
25
26
package com.liu.aop;

import org.aspectj.lang.ProceedingJoinPoint;

public class MyAspect {

public void before(){
System.out.println("前置增强~~~~");
}
public void afterReturning(){
System.out.println("后置增强~~~~~~~");
}
public Object around(ProceedingJoinPoint pjp) throws Throwable {
System.out.println("环绕前置增强");
Object proceed = pjp.proceed();
System.out.println("环绕后置增强");
return proceed;
}
public void throwing(){
System.out.println("异常抛出增强方法、、、");
}
public void after()
{
System.out.println("最终增强方法、、、、");
}
}

④将目标类和切面类的对象创建权交给 spring

在Spring配置文件中配置目标对象以及切面对象的bean

1
2
3
4
<!--目标对象-->
<bean id="target" class="com.liu.aop.Target"/>
<!--切面对象-->
<bean id="myAspect" class="com.liu.aop.MyAspect"/>

⑤在 applicationContext.xml 中配置织入关系

首先要导入aop的命名空间哦~然后再配置织入关系

1
2
3
4
5
6
7
8
9
10
11
12
13
14
15
16
17
18
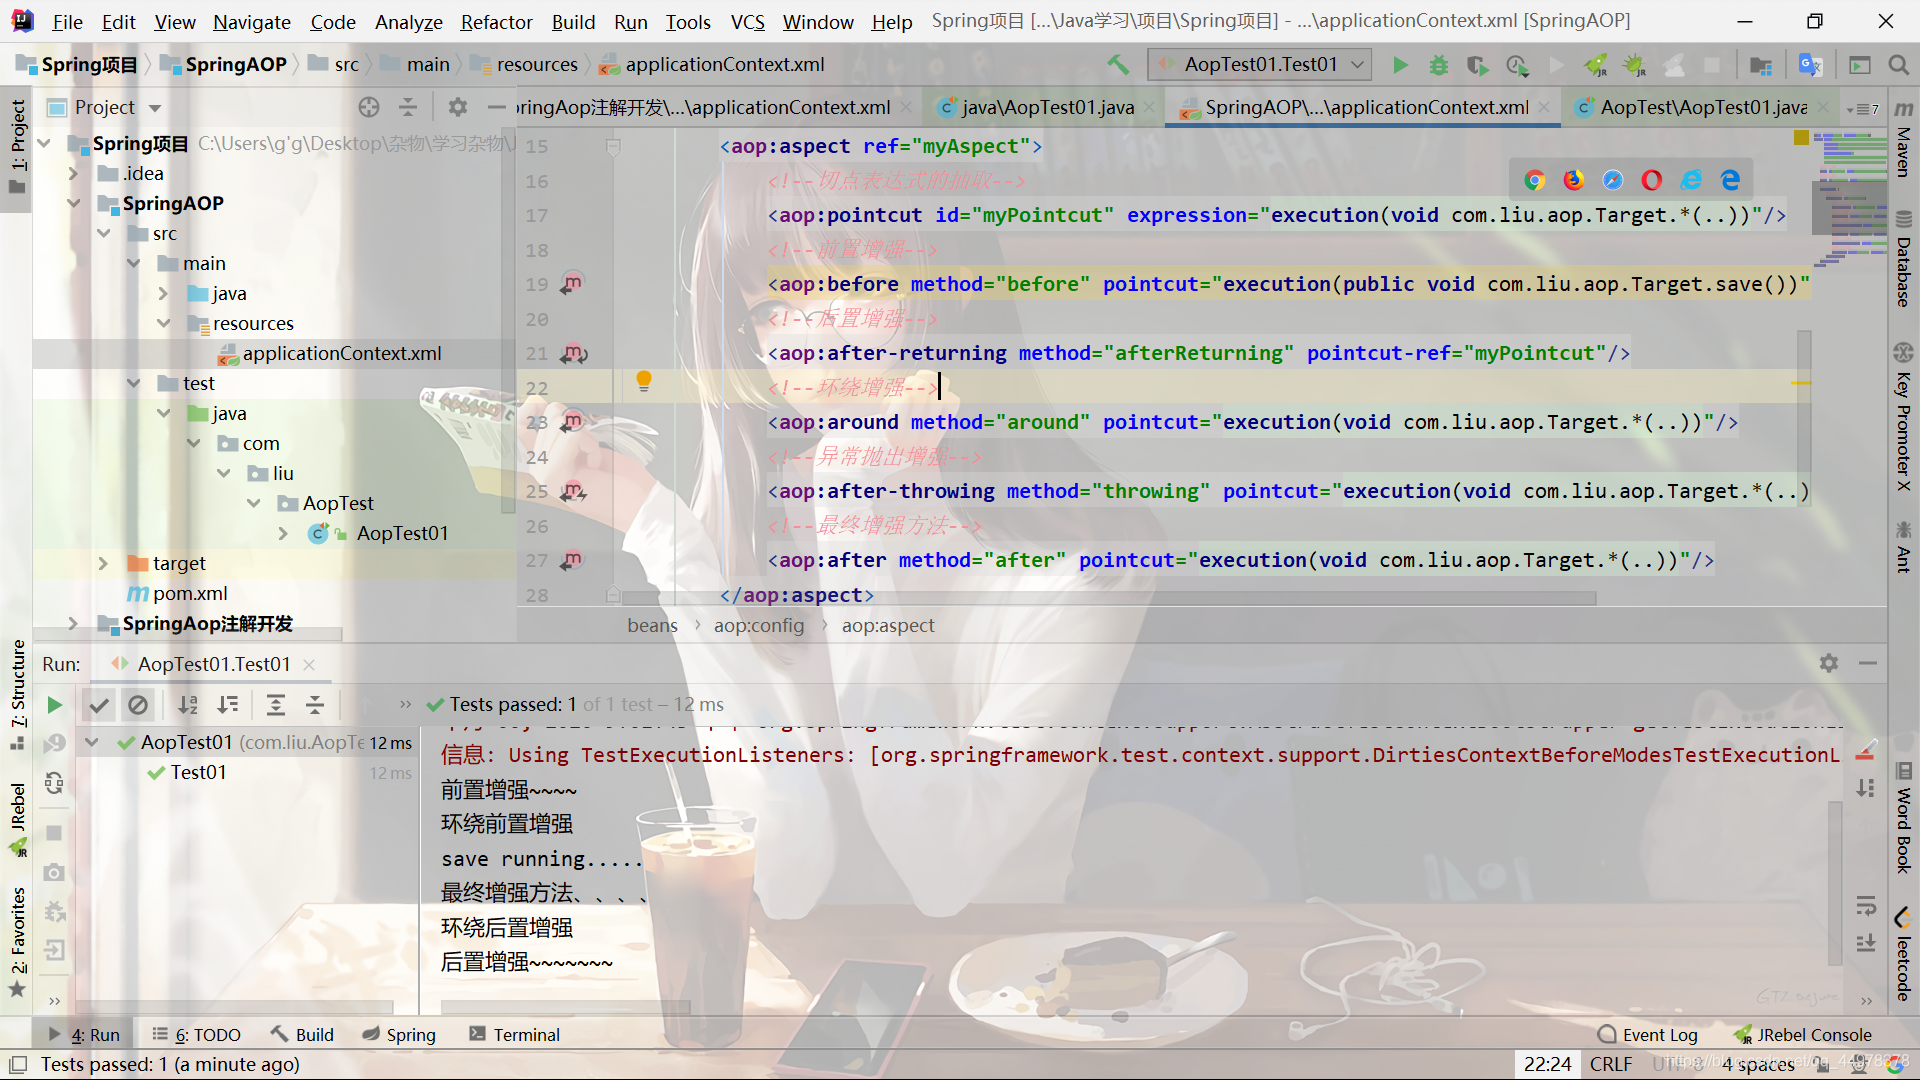
<!--配置织入:告诉Spring,哪些方法(指切点),哪些增强(前置,后置。。。)-->
<aop:config >
<!--声明切面的-->
<aop:aspect ref="myAspect">
<!--切点表达式的抽取-->
<aop:pointcut id="myPointcut" expression="execution(void com.liu.aop.Target.*(..))"/>
<!--前置增强-->
<aop:before method="before" pointcut="execution(public void com.liu.aop.Target.save())"></aop:before>
<!--后置增强-->
<aop:after-returning method="afterReturning" pointcut-ref="myPointcut"/>
<!--环绕增强-->
<aop:around method="around" pointcut="execution(void com.liu.aop.Target.*(..))"/>
<!--异常抛出增强-->
<aop:after-throwing method="throwing" pointcut="execution(void com.liu.aop.Target.*(..))"/>
<!--最终增强方法-->
<aop:after method="after" pointcut="execution(void com.liu.aop.Target.*(..))"/>
</aop:aspect>
</aop:config>

⑥测试代码

这里的测试使用的是Spring整合的Junit

1
2
3
4
5
6
7
8
9
10
11
12
13
14
15
16
17
18
package com.liu.AopTest;
import com.liu.aop.TargetInterface;
import org.junit.Test;
import org.junit.runner.RunWith;
import org.springframework.beans.factory.annotation.Autowired;
import org.springframework.test.context.ContextConfiguration;
import org.springframework.test.context.junit4.SpringJUnit4ClassRunner;

@RunWith(SpringJUnit4ClassRunner.class)
@ContextConfiguration("classpath:applicationContext.xml")
public class AopTest01 {
@Autowired
private TargetInterface target;
@Test
public void Test01(){
target.save();
}
}

运行结果:

在这里插入图片描述

七:基于注解的AOP开发

注解aop开发步骤

①使用@Aspect标注切面类

②使用@通知注解标注通知方法

③在配置文件中配置aop自动代理<**aop****:aspectj-autoproxy****/**>

①创建目标接口和目标类(内部有切点),将目标类创建权交给 spring

目标接口:TargetInterface

1
2
3
4
5
package com.liu.aop;

public interface TargetInterface {
public void save();
}

目标类:Target

1
2
3
4
5
6
7
8
9
10
package com.liu.aop;

import org.springframework.stereotype.Component;

@Component("target")
public class Target implements TargetInterface{
public void save() {
System.out.println("save running.....");
}
}

②创建切面类(内部有增强方法),将切面类的对象创建权交给 spring,在切面类中使用注解配置织入关系

通知的配置语法:@通知注解(“切点表达式”)

名称 注解 说明
前置通知 @Before 用于配置前置通知。指定增强的方法在切入点方法之前执行
后置通知 @AfterReturning 用于配置后置通知。指定增强的方法在切入点方法之后执行
环绕通知 @Around 用于配置环绕通知。指定增强的方法在切入点方法之前和之后都执行
异常抛出通知 @AfterThrowing 用于配置异常抛出通知。指定增强的方法在出现异常时执行
最终通知 @After 用于配置最终通知。无论增强方式执行是否有异常都会执行

切面类:MyAspect

1
2
3
4
5
6
7
8
9
10
11
12
13
14
15
16
17
18
19
20
21
22
23
24
25
26
27
28
29
30
31
32
33
34
35
36
package com.liu.aop;

import org.aspectj.lang.ProceedingJoinPoint;
import org.aspectj.lang.annotation.*;
import org.springframework.stereotype.Component;

@Component("myAspect")
@Aspect//标注当前类是一个切面类
public class MyAspect {
@Before("execution(void com.liu.aop.Target.*(..))")
public void before(){
System.out.println("前置增强~~~~");
}
@AfterReturning("execution(void com.liu.aop.Target.*(..))")
public void afterReturning(){
System.out.println("后置增强~~~~~~~");
}
@Around("execution(void com.liu.aop.Target.*(..))")
public Object around(ProceedingJoinPoint pjp) throws Throwable {
System.out.println("环绕前置增强");
Object proceed = pjp.proceed();
System.out.println("环绕后置增强");
return proceed;
}
@AfterThrowing("pointcut()")
public void throwing(){
System.out.println("异常抛出增强方法、、、");
}
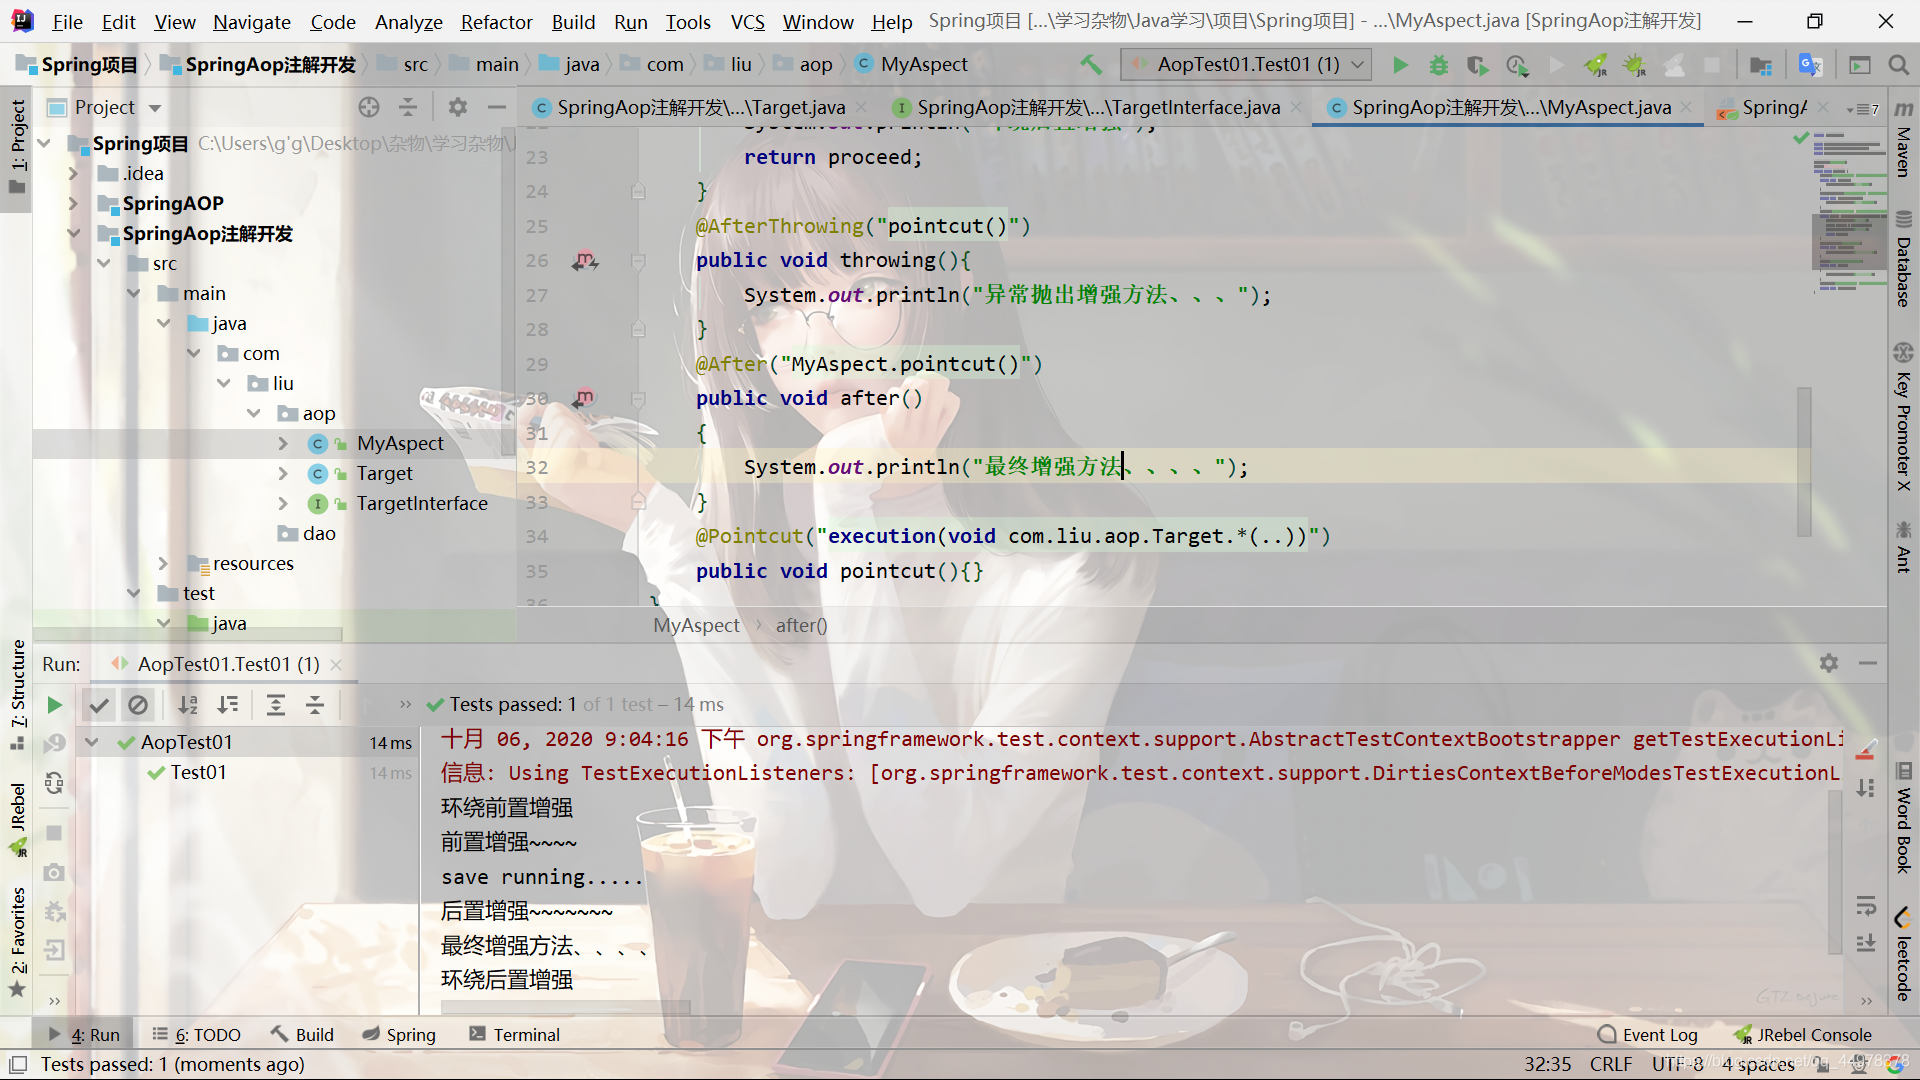
@After("MyAspect.pointcut()")
public void after()
{
System.out.println("最终增强方法、、、、");
}
@Pointcut("execution(void com.liu.aop.Target.*(..))")
public void pointcut(){}
}

④在配置文件中开启组件扫描和 AOP 的自动代理

1
2
3
4
5
6
7
8
9
10
11
12
13
14
<?xml version="1.0" encoding="UTF-8"?>
<beans xmlns="http://www.springframework.org/schema/beans"
xmlns:aop="http://www.springframework.org/schema/aop"
xmlns:context="http://www.springframework.org/schema/context"
xmlns:xsi="http://www.w3.org/2001/XMLSchema-instance"
xsi:schemaLocation="
http://www.springframework.org/schema/beans http://www.springframework.org/schema/beans/spring-beans.xsd
http://www.springframework.org/schema/aop http://www.springframework.org/schema/aop/spring-aop.xsd
http://www.springframework.org/schema/context http://www.springframework.org/schema/context/spring-context.xsd">
<!--设置组件扫描-->
<context:component-scan base-package="com.liu.aop"/>
<!--设置AOP自动代理-->
<aop:aspectj-autoproxy/>
</beans>

⑤测试

1
2
3
4
5
6
7
8
9
10
11
12
13
14
15
16
17
import com.liu.aop.TargetInterface;
import org.junit.Test;
import org.junit.runner.RunWith;
import org.springframework.beans.factory.annotation.Autowired;
import org.springframework.test.context.ContextConfiguration;
import org.springframework.test.context.junit4.SpringJUnit4ClassRunner;

@RunWith(SpringJUnit4ClassRunner.class)
@ContextConfiguration("classpath:applicationContext.xml")
public class AopTest01 {
@Autowired
private TargetInterface target;
@Test
public void Test01(){
target.save();
}
}

运行结果:

在这里插入图片描述

有的内容转载百度、黑马。侵权请联系,必删。只是用于个人学习总结,非商业
点击查看
-------------------本文结束 感谢您的阅读-------------------